Why You’ll Love Chicken Onigiri (Japanese Rice Balls) Recipe
Chicken onigiri is the perfect balance of convenience and flavor. The soft, sticky rice pairs beautifully with savory chicken seasoned with soy sauce, sesame oil, and optional mayo for a creamy touch. They’re easy to customize, fun to shape, and great for kids and adults alike. Whether you need a quick lunch, a snack for the road, or something to pack in a bento box, these rice balls deliver satisfaction every time.
Ingredients
(Tip: You’ll find the full list of ingredients and measurements in the recipe card below.)
-
2 cups cooked Japanese short-grain rice (warm, not hot)
-
1/2 cup cooked chicken breast, finely shredded or chopped
-
1 tablespoon soy sauce
-
1 teaspoon sesame oil
-
1 teaspoon mirin (optional)
-
1 tablespoon mayonnaise (optional, for creamier filling)
-
Salt to taste
-
1–2 sheets nori (seaweed), cut into strips
-
Toasted sesame seeds, for garnish (optional)
-
Plastic wrap or damp hands, for shaping
Directions
-
In a small bowl, mix the shredded chicken with soy sauce, sesame oil, mirin, and mayonnaise if using. Adjust salt to taste.
-
Divide the warm rice into 4 equal portions.
-
Place a piece of plastic wrap in your palm (or dampen your hands), then spread one portion of rice into a round or triangular shape.
-
Add a spoonful of chicken mixture in the center and fold the rice around it, enclosing the filling.
-
Shape into a firm but gentle triangle or round ball.
-
Wrap a strip of nori around the bottom for easy handling.
-
Repeat with the remaining rice and filling.
-
Garnish with toasted sesame seeds if desired.
-
Serve right away or wrap tightly for later, ideally eaten the same day.
Servings and timing
Servings: 4 onigiri
Prep Time: 15 minutes
Cooking Time: 5 minutes
Total Time: 20 minutes
Calories: About 190 kcal per onigiri
Variations
-
Use canned tuna with mayo instead of chicken for a classic tuna onigiri.
-
Add chopped pickled vegetables for extra flavor and crunch.
-
Swap nori for shiso leaves for a fresh herbal twist.
-
Mix furikake seasoning into the rice before shaping.
-
Use teriyaki chicken for a sweeter, saucier filling.
Storage/Reheating
Onigiri are best eaten the same day they’re made, but you can store them for later. Wrap tightly in plastic wrap and refrigerate for up to 1 day. To reheat, microwave gently for 15–20 seconds with a damp paper towel on top to prevent drying out. If packing in a lunchbox, keep the nori separate and wrap just before eating to maintain crispness.
FAQs
What type of rice is best for onigiri?
Japanese short-grain rice (sometimes labeled sushi rice) works best because it’s sticky and holds its shape.
Can I make chicken onigiri ahead of time?
Yes, you can prepare them in the morning for lunch or refrigerate them overnight, though they’re freshest the same day.
Can I freeze chicken onigiri?
Yes, wrap tightly in plastic wrap and freeze for up to 1 month. Thaw in the fridge before reheating.
Do I need nori to make onigiri?
No, nori is optional. It helps with handling and adds flavor, but you can enjoy them plain or use another wrap like shiso leaves.
Can I use leftover chicken?
Absolutely. Shredded rotisserie chicken or any leftover cooked chicken works well.
How do I stop the rice from sticking to my hands?
Dampening your hands with water or using plastic wrap makes shaping much easier.
What fillings go well with onigiri besides chicken?
Tuna with mayo, salmon flakes, pickled plum (umeboshi), or even vegetables are popular options.
Are chicken onigiri gluten-free?
Yes, as long as you use gluten-free soy sauce and ensure other ingredients are gluten-free.
Can I pack onigiri in a kid’s lunchbox?
Yes, they’re perfect for lunchboxes. Just wrap them well and keep them cool until lunchtime.
How do I keep the nori crisp?
Store the nori separately and wrap it around the rice ball just before eating.
Conclusion
Chicken onigiri is a simple, flavorful, and versatile Japanese snack that’s as fun to make as it is to eat. With just a few ingredients and quick prep, you can enjoy these delicious rice balls at home, on the go, or in a lunchbox. Whether you stick to the classic chicken filling or experiment with variations, this recipe is sure to become a favorite.
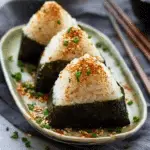
Chicken Onigiri (Japanese Rice Balls)
- Total Time: 20 minutes
- Yield: 4 onigiri
- Diet: Gluten Free
Description
Savory Japanese rice balls filled with tender chicken, wrapped in nori, and shaped by hand—perfect for lunch boxes, snacks, or a light meal.
Ingredients
- 2 cups cooked Japanese short-grain rice (warm, not hot)
- 1/2 cup cooked chicken breast, finely shredded or chopped
- 1 tablespoon soy sauce
- 1 teaspoon sesame oil
- 1 teaspoon mirin (optional)
- 1 tablespoon mayonnaise (optional, for creamier filling)
- Salt to taste
- 1–2 sheets nori (seaweed), cut into strips
- Toasted sesame seeds, for garnish (optional)
- Plastic wrap or damp hands, for shaping
Instructions
- In a small bowl, combine the cooked chicken with soy sauce, sesame oil, mirin, and mayonnaise if using. Stir well and adjust salt to taste.
- Divide the warm rice into 4 equal portions.
- To shape onigiri, place a piece of plastic wrap in your palm (or use damp hands), spread one portion of rice into a round or triangular shape.
- Add a spoonful of chicken mixture in the center and fold the rice around it, enclosing the filling completely.
- Shape firmly but gently into a triangle or round ball.
- Wrap with a strip of nori at the bottom for easy handling.
- Repeat with remaining rice and filling.
- Sprinkle with sesame seeds if desired.
- Serve immediately or wrap tightly for later—best eaten the same day.
Notes
- Keep your hands damp or use plastic wrap to prevent rice from sticking.
- Best eaten the same day for freshness.
- You can skip mayonnaise for a lighter version.
- Substitute with leftover rotisserie chicken for convenience.
- Add furikake or pickled vegetables for variation.
- Prep Time: 15 minutes
- Cook Time: 5 minutes
- Category: Snack
- Method: Hand-shaped
- Cuisine: Japanese
Nutrition
- Serving Size: 1 onigiri
- Calories: 190 kcal
- Sugar: 1 g
- Sodium: 330 mg
- Fat: 6 g
- Saturated Fat: 1 g
- Unsaturated Fat: 4 g
- Trans Fat: 0 g
- Carbohydrates: 26 g
- Fiber: 1 g
- Protein: 8 g
- Cholesterol: 15 mg


